
How to activate eSIM with SimAbove?
You can activate SimAbove eSIM using either a QR code or a manual setup.
See our easy step-by-step eSIM activation guide below.
Welcome to SimAbove eSIM
Activating your eSIM is quick and easy, and we’re here to guide you every step of the way. With our straightforward installation process, you’ll be connected in no time. There’s no need to worry—if you face any challenges or have questions, the SimAbove support team is always ready to assist you.
Your seamless travel experience is our priority, so relax and enjoy the convenience of SimAbove eSIM!
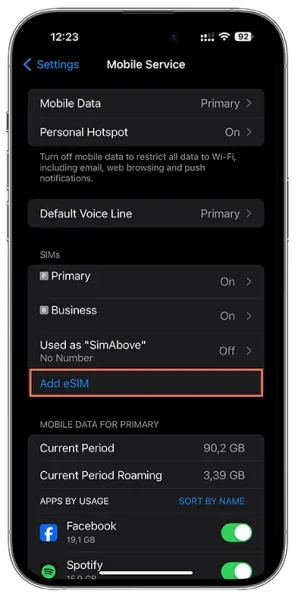
Go To Settings > Mobile Service

Press Add eSIM
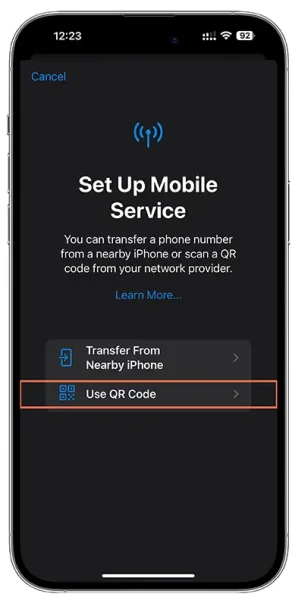
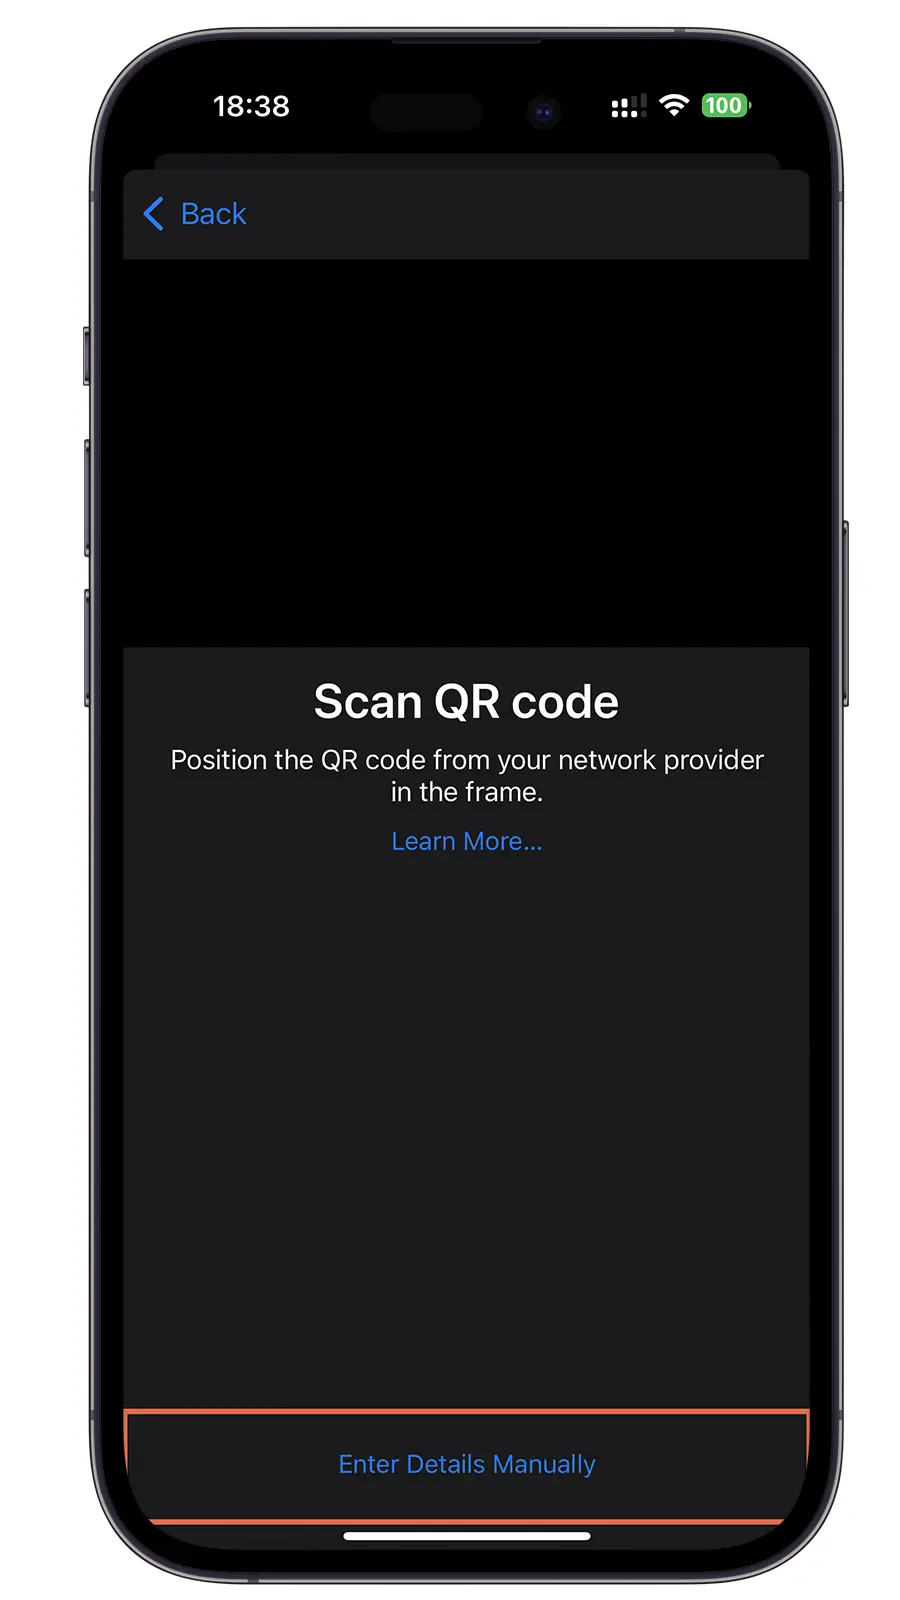
Press Use QR Code
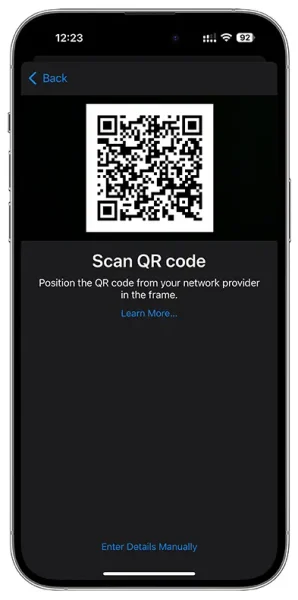
Scan QR Code received in Email
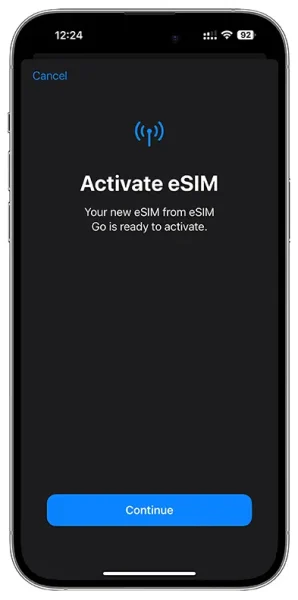
Press Continue
Wait For Activation...
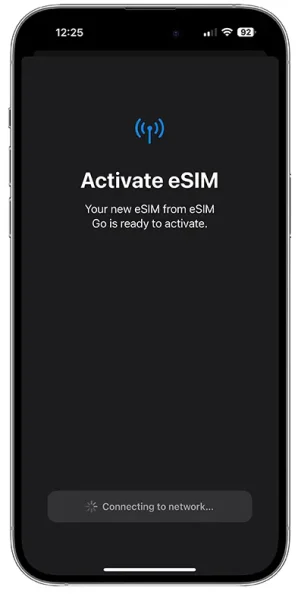
Please wait while connecting to the network. Sometimes, you might see an “Unable to Activate eSIM” warning. This means your eSIM will be activated upon arrival and upon first connection to the designated network.
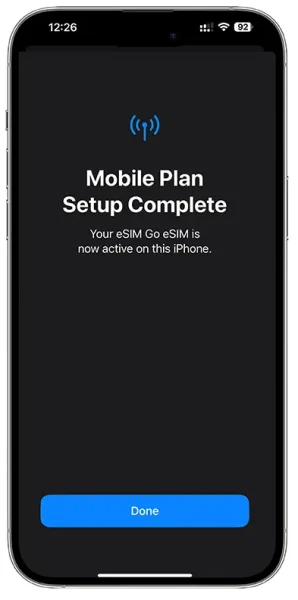
Congratulation! Your new eSIM is successfully installed. To Finish installation press Done!
You’re almost there—just two more steps, and you’ll be connected! 🎉
Congratulations on the progress you’ve made so far. You’re doing great!
At this rate, you’ll soon be a master of installing eSIMs. Who knows? Maybe next time, you’ll be helping your friends save money with SimAbove eSIM too! 😄 Let’s get you connected so you can enjoy the benefits of your eSIM in no time. 🚀
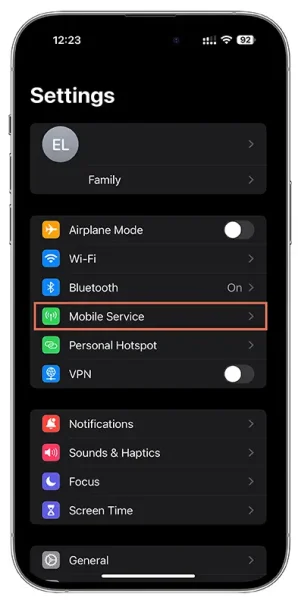
Go to Settings > Mobile Service
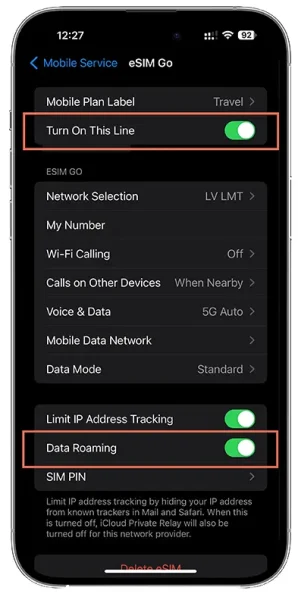
Open Simabove created eSIM Profile

Make Sure Turn On This Line and Data Roaming toggles are Switched ON
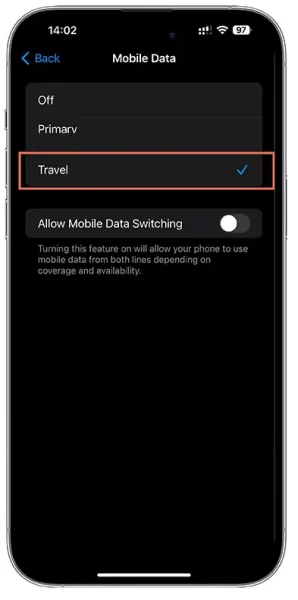
Go to Settings > Mobile Service
Press Mobile Data
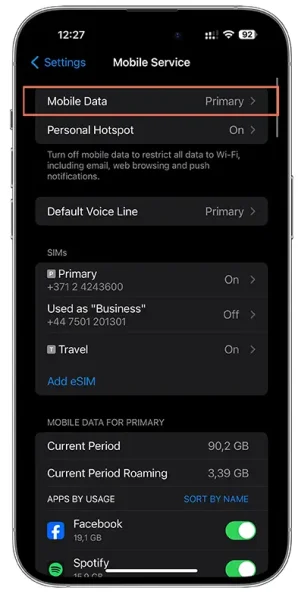
And change to SimAbove eSIM created eSIM profile. Could be one of these (Business, Mobile Data, Personal, Primary, Secondary, Travel). If all the steps were done correctly You should see 3G/4G/LTE/5G network sign next to network Bars Top Right Corner. Device connect to network could take up to 15 minutes.
Welcome to SimAbove eSIM
Activating your eSIM is quick and easy, and we’re here to guide you every step of the way. With our straightforward installation process, you’ll be connected in no time. There’s no need to worry—if you face any challenges or have questions, the SimAbove support team is always ready to assist you.
Your seamless travel experience is our priority, so relax and enjoy the convenience of SimAbove eSIM!
Open Settimgs > Mobile Service
Нажмите «Добавить eSIM».
Нажмите «Использовать QR-код».
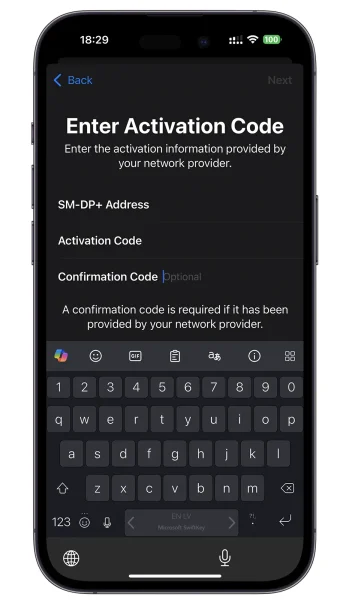
Нажмите «Ввести данные вручную»
Скопируйте и вставьте SM-DP + адрес и код активации из электронного письма, которое вы получили с QR-кодом eSIM, и нажмите «Далее».
Нажмите Продолжить
Wait For Activation...
Please wait while connecting to the network. Sometimes, you might see an “Unable to Activate eSIM” warning. This means your eSIM will be activated upon arrival and upon first connection to the designated network.
Congratulation! Your new eSIM is successfully installed. To Finish installation press Done!
You’re almost there—just two more steps, and you’ll be connected! 🎉
Congratulations on the progress you’ve made so far. You’re doing great!
At this rate, you’ll soon be a master of installing eSIMs. Who knows? Maybe next time, you’ll be helping your friends save money with SimAbove eSIM too! 😄 Let’s get you connected so you can enjoy the benefits of your eSIM in no time. 🚀
Go to Settings > Mobile Service
Open Simabove created eSIM Profile
Make Sure Turn On This Line and Data Roaming toggles are Switched ON
Go to Settings > Mobile Service
Press Mobile Data
And change to SimAbove eSIM created eSIM profile. Could be one of these (Business, Mobile Data, Personal, Primary, Secondary, Travel). If all the steps were done correctly You should see 3G/4G/LTE/5G network sign next to network Bars Top Right Corner. Device connect to network could take up to 15 minutes.
Welcome to SimAbove eSIM
Activating your eSIM is quick and easy, and we’re here to guide you every step of the way. With our straightforward installation process, you’ll be connected in no time. There’s no need to worry—if you face any challenges or have questions, the SimAbove support team is always ready to assist you.
Your seamless travel experience is our priority, so relax and enjoy the convenience of SimAbove eSIM!
Go To Settings > Connections

Press SIM Managaer
Press Add eSIM
Press Scan QR Code
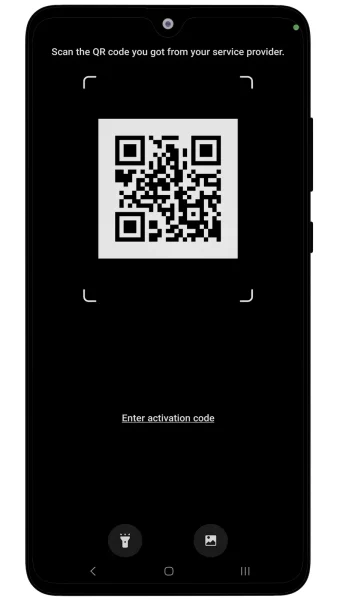
Scan QR Code form Email
You’re almost there—just two more steps, and you’ll be connected! 🎉
Congratulations on the progress you’ve made so far. You’re doing great!
At this rate, you’ll soon be a master of installing eSIMs. Who knows? Maybe next time, you’ll be helping your friends save money with SimAbove eSIM too! 😄 Let’s get you connected so you can enjoy the benefits of your eSIM in no time. 🚀
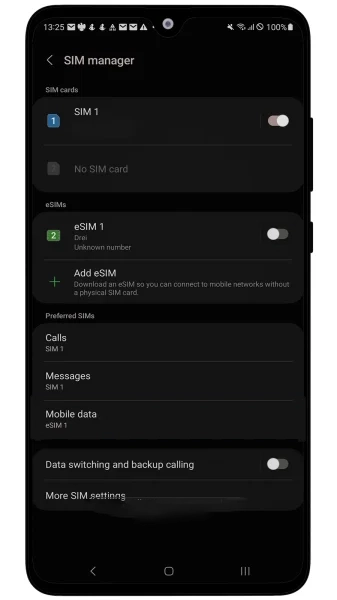
Go To Settings > Connections > SIM Manager and make sure SimAbove created eSIM is ON and Mobile data switched to the same eSIM
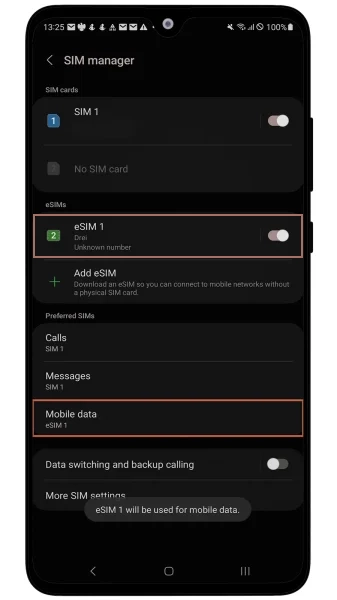
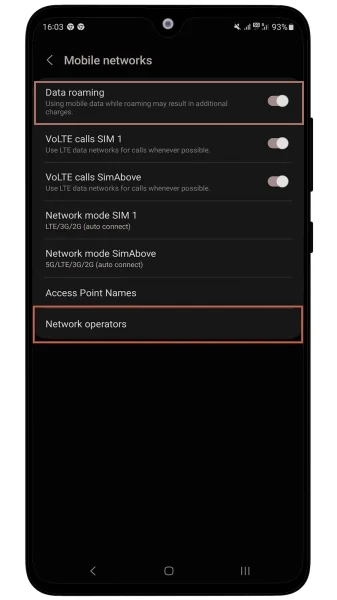
Go To Settings > Connections > Mobile Networks and ensure that Data Roaming is ON. Also make sure that Network Operators under SimAbove eSIM are set to connect to network Automatically.
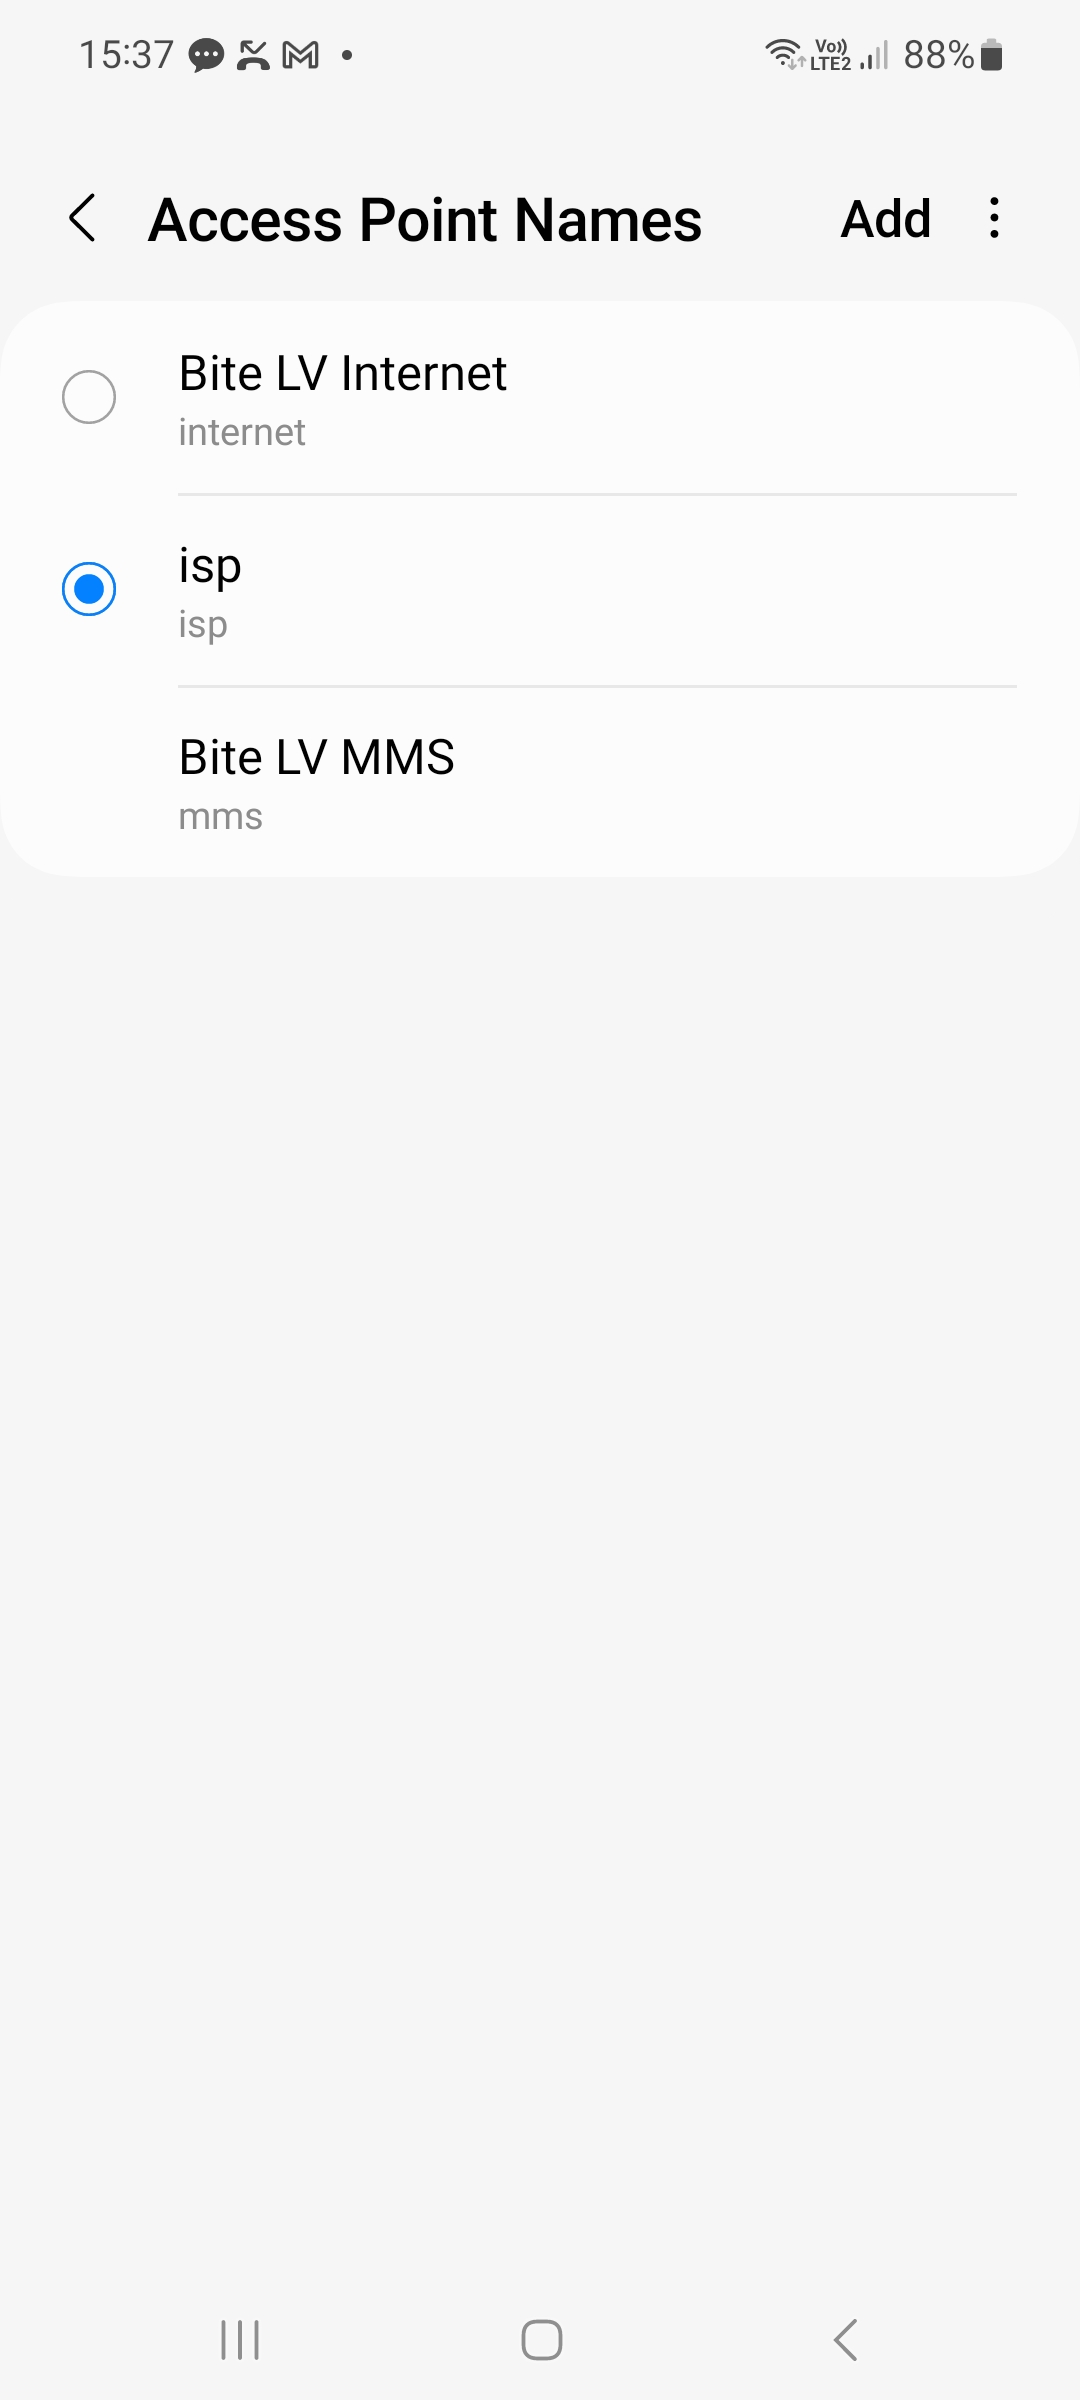
FOR TURKEY DAY PLAN ONLY! Open Settings and search Access Point Names. Open and press Add or +. In name and APN sections write: isp and press back. And choose newly created APN.
If all the steps were done correctly You should see 3G/4G/LTE/5G network sign next to network Bars Top Right Corner. Device connect to network could take up to 15 minutes.
Welcome to SimAbove eSIM
Activating your eSIM is quick and easy, and we’re here to guide you every step of the way. With our straightforward installation process, you’ll be connected in no time. There’s no need to worry—if you face any challenges or have questions, the SimAbove support team is always ready to assist you.
Your seamless travel experience is our priority, so relax and enjoy the convenience of SimAbove eSIM!
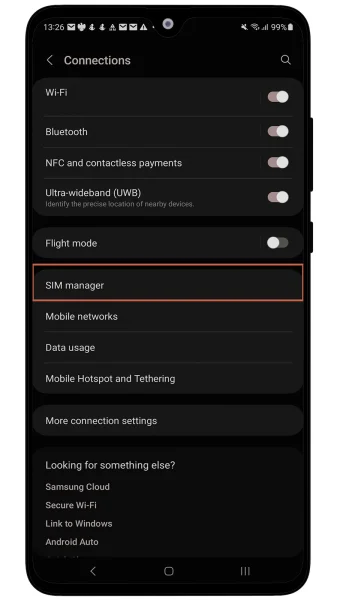
Go To Settings > Connections
Press SIM Manager
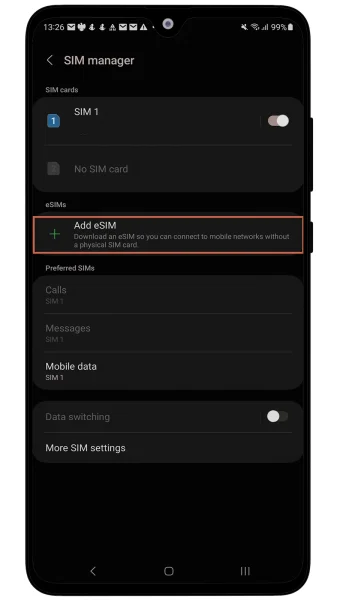
Press Add eSIM
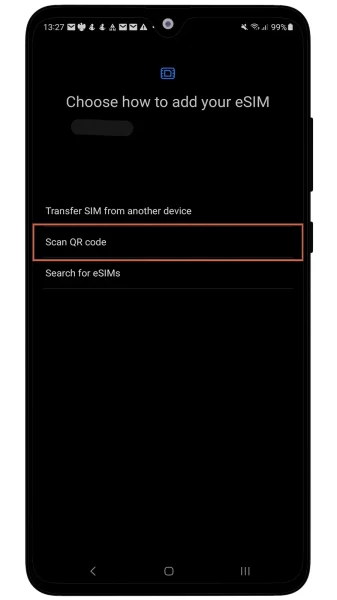
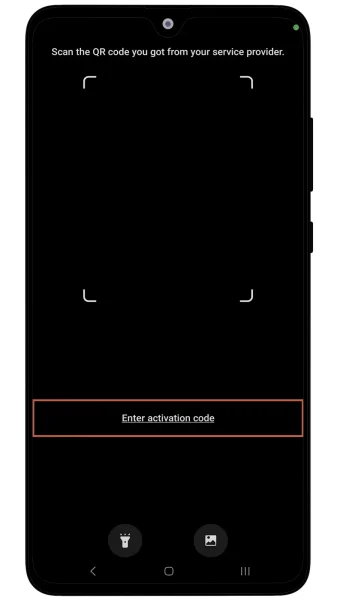
Scan QR Code
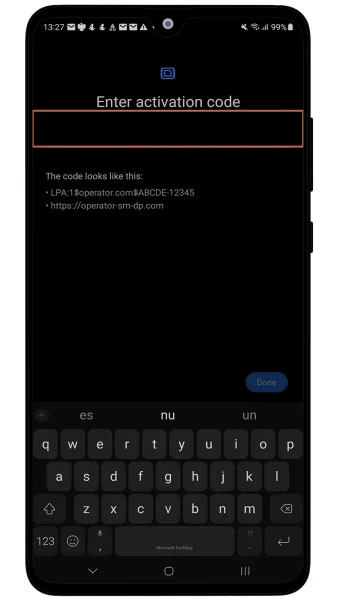
Press Enter Activation Code
Copy and paste the activation code from the email. You will find code in Manual Installation section for Android. Copy whole line starting with LPA: then press Done.
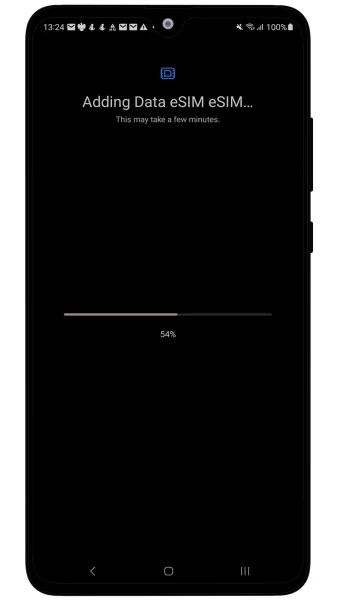
Wait for eSIM activation
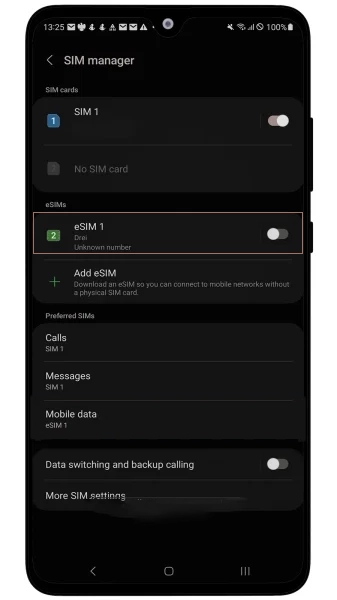
If the eSIM installation was done correctly, you should see the newly created eSIM listed under your eSIMs.
You’re almost there—just two more steps, and you’ll be connected! 🎉
Congratulations on the progress you’ve made so far. You’re doing great!
At this rate, you’ll soon be a master of installing eSIMs. Who knows? Maybe next time, you’ll be helping your friends save money with SimAbove eSIM too! 😄 Let’s get you connected so you can enjoy the benefits of your eSIM in no time. 🚀
Go To Settings > Connections > SIM Manager and make sure SimAbove created eSIM is ON and Mobile data switched to the same eSIM
Go To Settings > Connections > Mobile Networks and ensure that Data Roaming is ON. Also make sure that Network Operators under SimAbove eSIM are set to connect to network Automatically.
FOR TURKEY DAY PLAN ONLY! Open Settings and search Access Point Names. Open and press Add or +. In name and APN sections write: isp and press back. And choose newly created APN.
If all the steps were done correctly You should see 3G/4G/LTE/5G network sign next to network Bars Top Right Corner. Device connect to network could take up to 15 minutes.